This morning I was reading an article that shows how someone break into KPU (Commission for National Election in Indonesia) and did some security audits. Here’s the link http://audit-kpu.blogspot.com/2014/07/security-audit-sistem-it-kpu-pilpres.html?m=1
My concern is that the security on KPU’s server was so low and the quality of application being built are below standard. It shows that it being built in a hurry. I laugh myself out loud when I saw how they secure the SSH using standard config without any additional security features. That was so stupid for an institution that watch over Presidential Election. I can say that the server on the Library in my office is more secure than servers in KPU.
In this article I will describe how to secure your server SSH configuration using public key. The simulation involved Windows 7 as the SSH client and Ubuntu 14 Server as the remote target. The advantage of using Public Key security feature is eventhough someone got your Key Passphrase they still cannot access your account without having the proper asymetric keys. To explain it in simple language is like having a complete set of padlock (Public Key) and its key (Private Key). Every communication was encrypted using your padlock but only you have the key. You can give your padlock to anyone and when people want to communicate with you they simply sent a boxed message locked by your padlock and only you can open it using your key.
We will start by changing configuration on the server first. Level of understanding needed to apply this tutorial is Medium.
What you will need is to download PuTTYgen from http://www.chiark.greenend.org.uk/~sgtatham/putty/download.html
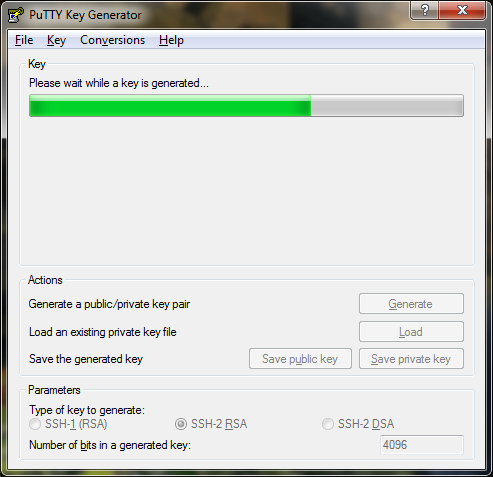
Open the PuTTYgen, set ‘Parameters‘ to SSH-2 RSA and ‘Number of bits in a generated key‘ to 4096 then press ‘Generate‘
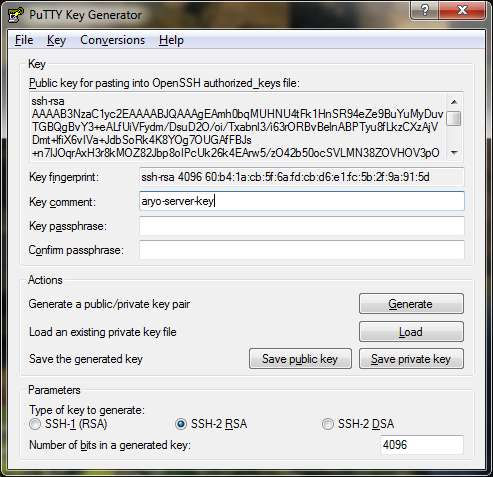
After the key is being generated you will need to enter some Key passphrase, make sure its different than the password on your server. Copy the generated key temporary using Notepad or WordPad on Windows 7. Save the public key and Save the private key on a secret folder.
Access your server through normal SSH using PuTTY. Edit your SSH configuration using this command
sudo nano /etc/ssh/sshd_config
Below is what my sshd_config look like, I narrow only specific user that can login to the server through SSH (which is my user :P). It can be found on line AllowUsers. Uncomment the AuthorizedKeysFile, you will also need to create the directory .ssh by invoking below command on /home/username
sudo mkdir -p .ssh/
Change also the PasswordAuthentication to no
Port 22

Protocol 2

HostKey /etc/ssh/ssh_host_rsa_key
HostKey /etc/ssh/ssh_host_dsa_key
HostKey /etc/ssh/ssh_host_ecdsa_key
HostKey /etc/ssh/ssh_host_ed25519_key

UsePrivilegeSeparation yes

KeyRegenerationInterval 3600
ServerKeyBits 4096

SyslogFacility AUTH
LogLevel INFO

LoginGraceTime 120
PermitRootLogin no
StrictModes yes
AllowUsers Test_Aryo

RSAAuthentication yes
PubkeyAuthentication yes
AuthorizedKeysFile %h/.ssh/authorized_keys

IgnoreRhosts yes

RhostsRSAAuthentication no

HostbasedAuthentication no

PermitEmptyPasswords no

ChallengeResponseAuthentication no

PasswordAuthentication no

X11Forwarding yes
X11DisplayOffset 10
PrintMotd no
PrintLastLog yes
TCPKeepAlive yes

AcceptEnv LANG LC_*

Subsystem sftp /usr/lib/openssh/sftp-server

UsePAM yes
Paste previously copied SSH key to the authorized_keys file in .ssh directory using below command
sudo nano /home/username/.ssh/authorized_keys
and restart the SSH service
sudo service ssh restart
you can make it more complicated by changing the SSH port into non-standard port number, example: 3222.
on the first line change Port 22 to Port 3222
Or to avoid service fingerprinting you can always download the OpenSSH source code, change the service signature and re-compile it manually. So when someone tried to guess what kind of service running in your server box they will not know it.
We have completed the first part of this tutorial and we will move to the next one, Securing SSH using Public Key authentication – Part 2: Accessing through client.

Securing SSH using Public Key authentication – Part 1: Configuring the server by M. Aryo N. Pratama is licensed under a Creative Commons Attribution-NonCommercial-ShareAlike 4.0 International License.
Based on a work at http://www.halilintar.org/.
Permissions beyond the scope of this license may be available at http://www.halilintar.org/.
Good one Aryo! Very informatif and easy to read.